Christmas Trees on the Run
January 5, 2013 § Leave a comment
The last piece of Christmas sewing was a table runner for Bif’s grandmother. She had specifically asked for something hand-made and the only thing I could think to make was something Christmas-y. I searched the interwebs for Christmas table runners that were a bit different and stood out, but most of them had backing or were set on to something. I struck gold when I found these two images;


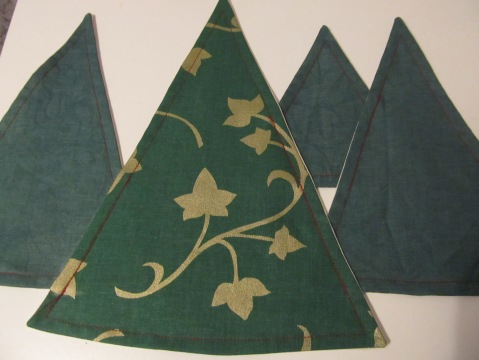
By combining the two, I got this; a forest of trunkless Christmas trees
I cut out four different sizes of trees, with a curved base so they didn’t look so stiff. I don’t remember the widths, but the biggest tree was 20cm tall, the second 17cm, the third 15cm and the smallest 10cm. I cut them out of two different fabrics, though if I would have done more if I had had the fabric on hand. I cut out a white cotton to sew on the back as well so the edges wouldn’t be visible.
The basic process was as follows;
- Sew cotton and main fabric together, right sides facing, leaving a small gap at base to flip the tree inside out. Flip the tree inside out. Iron.
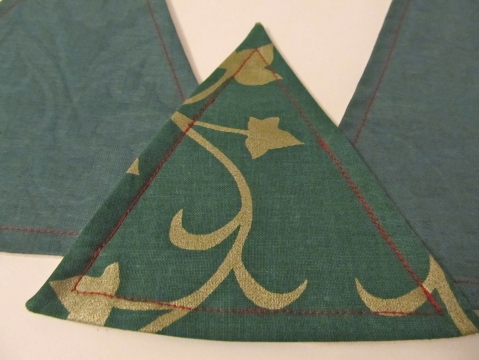
- Stitch around the right side of the tree, sealing the gap at the base.
- Do this for all the trees and then arrange them in an order you are happy with.
- Stitch them together, following the lines you have sewn on the outside to hide the extra stitching.
Simple, right? I imagine this would also be pretty easy to do with other shapes like this one. Maybe adding some interfacing would help it stay more stiff as well. We live and we learn.
Til next time!
My Dream Tutorial
March 5, 2012 § Leave a comment
Since I am delving in to making children’s clothes for my boyfriend’s younger sisters, I have been doing a bit of research on drafting patterns for smaller humans. I came across these fantastic tutorials about drawing basic body slopers for children, BUT they can be easily adapted to adults and LiEr even includes little hints about how an adult female’s sloper differs from a child’s sloper. Only days a go, I was looking for a simple tutorial with pictures (just so you know you’re doing it right) with fewer numbers and calculations than the ones on the Burda site, which I’m sure are correct and work great, but they confuse the heck out of me. LiEr’s tutorials have answered my sewing prays!
Croqui Tutorial
January 27, 2012 § Leave a comment
Here’s the method I used to create my Croqui. I got the basic one from lladybird and tweaked it a bit to work for Mac. I used a program called GIMP which is more or less like photoshop. These instructions will be how I did it on my Mac but you would be able to do it on your PC as well with out much difficulty.
1. Take a picture while standing in your underwear or some tights and a tight-fitting tee. It’s best to take the picture from your natural waist height so you get the proportion right. From lower you seem taller and from above you seem shorter, etc. Standing against a plain background is best. Make sure your hair is behind your shoulders so you can get a clear shoulder profile to trace around.
2. Open in your favourite photo editing program (I used iPhoto) and crop the image so it’s just you. Change it to black and white, or to which ever effect (sepia etc) makes the outline of your body stand out the most. I used black and white and then adjusted the contrast, saturation and shadows. Save somewhere that is easy to find (desktop is always good).
3.Open GIMP. If it’s the first time you open it, it may take a while for it to open up (it did for me). Click File. Open. Find your image and open it.
4. Find the tool on the left hand menu that looks like a lasso, or is the third option on the top row. Under your image, there is a percentage box. This is the Zoom. Zoom to where it is most comfortable and use the “lasso” tool to outline your body as accurately as possible. You can either click and drag to draw free hand, or click and release, then click another point to draw a straight line. I did the latter of the two as it was less messy. Should you make a mistake, simply hit delete (backspace) and it will cancel your last move or Esc to cancel the whole action to restart. I cut off my hair at this point, and added some fake stuff after to get a clear head shape. When you are done, there should be a dashed line moving around the image. Right-click, Edit and copy.
5. File. New. A box will pop up asking you which template to use. I ignored that drop menu and went to the second one where it says pixels. Click the arrow and find millimetres. In the “width” type 1000 and “height” 900. I found the preset templates were too small so I did it this way. If it is still to small just increase the width and height dimensions. On the new page, right-click, Edit and paste. Your outlined self will pop up.
6. On the left hand tool bar, find the paint brush. You will only be able to use the paint brush on top of your image as long as the dashed lines are there, as the image has not been attached to the “layer” below. The is convenient for us because you can go around the outside of your body a lot quicker and with a lot less mess. Go around with the paint brush creating a black line around the outside of your body. This will be the final outline so choose how thick you would like it to look at the end. To use the paint brush click and drag and free hand it.
7. Once the outline is done, go to the pencil, next to the paint brush, and use it to draw in any features such as knees, collar bones, breast curves, crotch, chin etc. Make the pencil line thinner by adjusting the “scale” slider on the left.
8. When you are happy with your drawing, go to the “Colours” menu and click on “brightness-contrast”. Move the sliders right up and your image will go white, leaving your outline. Before you click “OK”, check that you are happy with your outline. If your outline is grey, put the “brightness” slider on 126 instead of 127 and it will become black again.
9. Right-click on your outline, Layers and find “Anchor layer”. Your outline is now on the background layer and you can add any details you wish such as hair. To change the colour for your hair, click on the black box on top of the white one. Find the colour you want. To “Fill” find the paint bucket tool and click where you want it to go. Make sure all your lines connect around your hair, or anything else you have done, otherwise the whole page will turn a different colour. And Volia! Your very own Croqui!. When saving, make sure to click save as, select file type (by extension) and find the JPG one so that you can open it in other programs if you wish.
If you have any questions or something is not clear, please leave a comment below 🙂


